
Circle Punch Frame
This tutorial is written for Paint Shop Pro, version 8.
You don't need any outside filters, just Paint Shop Pro,
download a demo here: http://www.jasc.com.
You will also need this Purple Haze pattern: Purple Haze pattern
Unzip it into your patterns folder in PSP.
If you would like to use the same image that I used -
download the image here.
Unzip the image to your favourite folder, open up in PSP,
duplicate it (Shift+D) and close the original.
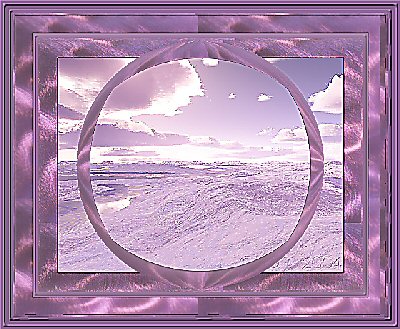
This is what we are going to create:
Choose Image/Add borders, make sure that symmetric is checked
and then enter 25 on left, righ, top and bottom.
Use a colour that is different from your image,
(I used black). Use your magic wand with these settings
in the tool options box:

Click once on the added border, it will now be selected.
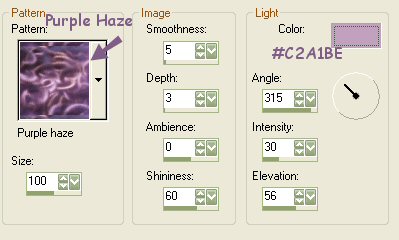
Choose Effects/Texture Effects/Sculpture with these settings:
Do not deselect.
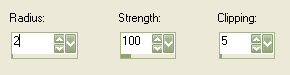
Now go to Effects/Geometric Effects/Circle,
you will now have a selected circle.
Choose Adjust/Add/remove Noise/Texture Preserving Smooth,
and in Amount of Correction enter 50 and press OK.
Selections/Selections Invert.
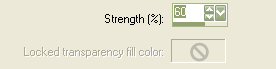
Adjust/Sharpness/Unsharp Mask with these settings:
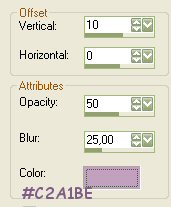
Let's add some shadow, välj Effects/3D effects/Drop Shadow:
Selections/Select None.
Image/Add Borders with the same settings as above,
but change all numbers to 10. (Use a color that does not exist in your image).
Select with the magic wand and floodfill with a
colour from your image, I used #805D88.
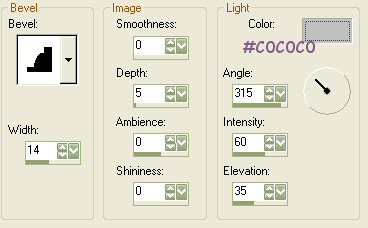
now choose Effects/3D Effects/InnerBevel:
Effects/Distortion Effects/Punch:
Selections/Select None.
Image/Add Borders as above and change all numbers to 25.
Remember to use a different colour than the ones in your image.
Select with the magic wand, floodfill with a colour,
I used #805D88 again. Go to Effects/Texture Effects/Sculpture, settings as above.
Now go to Adjust/Add/Remove Noise/Texture Preserving Smooth
in Amount of Correction enter 50 and press OK.
Effects/3d Effects/Drop Shadow, same settings as above.
Repeat but change vertical to -10 (minus 10).
Selections/Select None.
Choose Image/Add Borders, all numbers should be set to 10.
Select with the magic wand, floodfil with a colour,
once again I used #805D88, go to Effects/3D Effects/InnerBevel
with the same settings as above, then go to
Effects/Distortion Effects/Punch, use the same settings again.
Selections/Select None.
Finally let's add another border (Image/Add Borders),
all numbers set to 10, floodfill with a colour (I used #805D88),
select with the magic wand and use the same InnerBevel as above.
The only thing you will need to do now is to choose Image/resize.
And then sharpen the image by going to Adjust/Sharpness/Sharpen.
Your frame is finished!
Thank you for doing my tutorial.
If you have any questions or comments - feel free to email me.